Cloth in AM
Preface
This is an intermediate/advanced Animation:Master tutorial. It assumes knowledge of basic modeling and animating techniques, including what defines a patch, spline extrusion, what a bone is, associating geometry with bones, and how to rig and animate bones. Almost all the covered techniques apply from the first instantiation of AM Cloth, back in v8.5 and work in the 10.5 series as well (unfortunately, I can not vouch for the 9 series, since I never used that version). There are some differences between the two, and I will highlight them as I go.
Also, this is a lengthy tutorial. That is because I am trying to put forth as exhaustive a treatment of AM’s Cloth technology as I am able, how it works, and how to work with it. It has hitherto remained largely unused by AM users; few have delved into it and fewer still have written anything about it. Because it works so differently from other parts of the program, it necessitates some background in its basic functionality. So, my goal here is less of a tutorial and more of a “Cloth Manual”. I ask that you follow along with my basic examples and their subsequent analysis, so that you can learn how and where to apply the various techniques described here.
Introduction
Defining terms
In the context of Animation:Master, when you want to add clothes to a character, you mean one of two different things:
- adding a model that looks like a particular piece of clothing, like a dress, a sweater, a shirt, a coat, etc; or
- applying cloth technology to a particular model or a region of a model to apply automated secondary animation to that model or region.
Of course, these are by no means mutually exclusive, but they do involve a variety of different rigging and animating techniques and result in rather different final animations.
For the purposes of this tutorial, I will refer to #1 simply as cloth, clothing, clothes, etc while #2 I’ll refer to as AM Cloth, to distinguish between the everyday concept of clothing and the particular technology that AM uses to create a dynamic system of Masses and Springs that control the mesh’s deformation.
Most of the time, a user will not need or even want to actually implement AM Cloth for clothing. Bone movement and its attendant technologies like Smartskinning and Poses will be the preferred method of animating the clothing a character may be wearing more often than not. Gloves and jeans are excellent examples of clothing that, as long as a character is wearing them, don’t require AM Cloth. They are stiff and tight enough that bone animation is going to produce the best results. For items that are just a little looser, Pose animation goes a long way to giving just a hint of secondary motion.
As much as possible, this method of animation should be preferred. AM bone control is the surest way of controlling the behavior of mesh deformation during animation. Using AM Cloth on any part of your model is, in fact, giving up control of your mesh deformation. AM Cloth gets the final word in what your mesh does and you can only influence its movement with parameters and the surrounding objects in your scene. In other words, in using AM Cloth you sacrifice primary bone control for uncontrolled secondary motion.
So why on earth would anyone ever want to use AM Cloth for anything? Well, for one, there are other items of clothing, such as a flowy skirt or a billowing shirt, where trying to control all the motion through bone movement would be tremendously difficult. Secondary motion adds a lot of really great animation, and is one of the chief reasons to use a computer to animate to begin with. Also, control structures can be added in to exert higher and more direct influence on the motion of the cloth giving more controlled, predictable results, and without sacrificing the fun and often very visually gratifying effect of a chaotic system. Finally, and most importantly, using AM Cloth, you gain the advantage of animating through a system, where the motion of one part affects every other part.
This tutorial is then ultimately about adding in control structures to a given model or parts of a model to enable us to use the control of bones with the system of AM Cloth. The use of these control structures will not only allow for controlled Cloth movement in items of clothing, but can also be applied to musculature on a character to create convincing muscle flexing in complex areas of the body, such as the chest, shoulder and thumb.
It also asks a fundamental philosophical shift in thinking from other animation techniques. Muscle animation is simply direct, overt control over the mesh deformation during animation. Bone animation is the first level of abstraction. You tell the mesh to follow certain bones and then tell the bones to move and rotate in space. If you include rigs, Smartskin and Poses, the bones then affect each other according to rules that you establish. But in the end, all they can do is affect each other. The mesh simply follows along obediently with whatever the bones are doing. With Cloth, the mesh reacts to itself by virtue of being bound to Masses. Thus the control techniques are equally different; it amounts to direct control of things to exert indirect control over the mesh. It is then the second level of abstraction.
How AM Cloth Works
The Cloth Wizard does its magic
We will first have to familiarize ourselves with the functionality and behavior of AM Cloth. Start by creating a new model and making a simple grid. Right click on the model’s name and go down to Plug-ins > Wizards > Grid. At the dialog box, make a grid of 50x50 cm with a Step Height and Width of 10 cm. Add a bone and add all the geometry of the model to the bone. Next, open a new Action and animate the bone moving around, changing its position, orientation, whatever, and have it do so for about 40 frames. AM Cloth runs in simulation, which means that it needs something in the Action to be moving (by the way, a Choreography will do just as well, but let’s stick to Actions for now and get to the Choreographies later). It also means that editing and tweaking it with keyframes is a very difficult task, but more on that later.
As unexciting as this is, it will be invaluable to demonstrate the main feature of how Cloth is generated and behaves. Right now, the geometry should simply be flying around maintaining its original relative position to its bone. This is the simplest example of the geometry obeying the bone during animation. It is also the simplest example of geometry control through bone animation. Now let’s add some AM Cloth to see what happens.
Go to Frame 0 and go into Muscle Mode by hitting the F7 key. Drag a bounding box around the entire model to make a new group out of that. Right Click on the group and go down to the Cloth Wizard option.
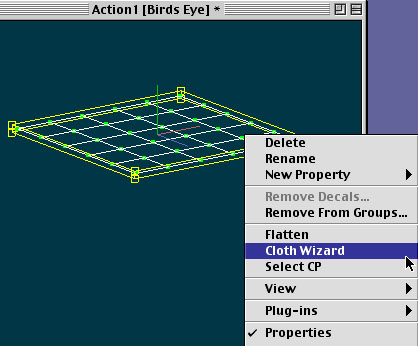 In Muscle Mode of the Action, Right Click on the group to call up the Cloth Wizard.
AM has now created and applied Cloth to your model. You can see what it has done by clicking on the Dynamics Mode button, which is at the top of the interface next to Muscle and Bones Mode.
Look carefully at your model in Dynamics Mode. Things seem very similar to Muscle Mode, but what is being represented is quite different. In Muscle Mode, a CP is a little red pixel, and a spline is white line. Here in Dynamics Mode, a little red pixel is actually a Mass and every white line is a Spring that connects one Mass to another. What’s deceptive about this representation is that the Masses are in precisely the same location as a CP. If you open the Splines folder in the Action, you can see that all those CPs have been constrained to particular Masses. This is the guts of the Cloth Wizard: It creates a Mass at every CP of the group and binds the Mass to surrounding Masses via Springs. So the ultimate animation paradigm is when Masses move, the constrained CPs follow them and the Masses react to each other as they push and pull on the Springs that bind them to one another.
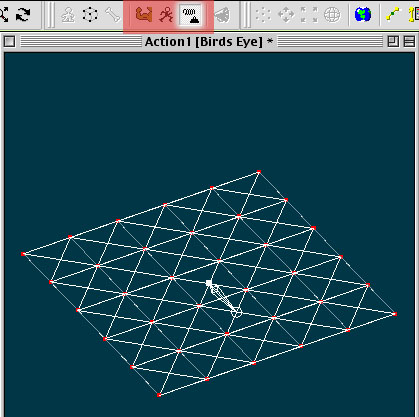 The Springs and Masses of Dynamics Mode.
Go back into Muscle mode. I find that for the purposes of running the simulation, Muscle or Bones mode is the fastest redraw rate making the process go a bit faster. If you scrub through the Action now, nothing has changed. The plane still moves around with the bone. This is because the simulation has not yet been run. Go back to Frame 0, and Right Click on the name of the Action and scroll down to “Simulate Spring Systems”. The animation will play and AM calculates in real time where the Cloth should go based on the parameters, objects and forces present in the Action.
You should see the plane simply fall away into oblivion. This is because the Cloth really only has one force to react to in the entire Action. If you look at the Properties of the Action, under dynamics, you should see that gravity is turned on by -100 being in the Y value (this is the default value). The other things that Cloth could react to are absent in this simple example. Most important to notice however that it doesn’t pay the slightest bit of attention to the bone movement. Whatever your bone may be doing has no impact on this animation. This is what I meant earlier by uncontrollable movement - whatever bone or muscle movement you put in has no impact whatsoever on the resulting Cloth simulation.
Here is the list of things that you can use to control the behavior of Cloth:
- Its Mass, Spring, and collision detection settings in the Properties Panel
- Other objects (to collide with)
- Forces in the Action.
- Parts of the model that are not part of the Cloth group.
Collision Detection
Cloth interacting with other objects.
Let’s see how collision detection works before we get too much further. Back in your modeling window, create a patch-dense sphere, and center it a little bit under your plane. Make sure that the normals of the grid are facing down and those of the sphere are out. Also, it should have its own bone that is not parented to the grid’s bone. Back in your action, you will have to delete a few things before proceeding. The Cloth sim tends to “remember” its previous state, so it’s always better to delete and start over. You’ll have to delete the Action Objects folder and the Splines folder. The Splines Folder contains constraining information of which CP goes to which Mass and if we create a new Spring System, it’s possible that the Masses will be renamed, and a new Spring System will distort the Mesh. In 10.5 an actual object has been created under the Objects heading in the Project WorkSpace (whereas in 8.5 there is only an Action Object). You should delete this as well.
Before you run another simulation, you should extend the animation just a little bit longer. Make a key frame of the grid plane moving or rotating at Frame 100.
Go back to frame 0 and run the simulation. Here’s my result:
The Cloth Group interacting with another object.
The grid still falls, but now it interacts with the sphere, draping itself over it before slipping off and falling into oblivion. All in all, the motion is quite nice, with some problems. Of course, it still does not react to the bone motion in the slightest, but we have learned one method to effect its motion - we can surround it with other objects that’ll influence where it goes. Of course, the motion isn’t really satisfactory, and remains problematic for a pretty basic reason. Notice how after the grid lands on the sphere, parts of the grid have fallen into the sphere. It is this kind of interpenetration that is so important to avoid in computer graphics. Worse still, if you look carefully at the last few frames, it seems to fling itself off the sphere, which is not at all how a real piece of cloth would slide off something. It should not gain momentum from having fallen onto something.
The reason why this happens and what makes interpenetration so very bad when it comes to AM Cloth is because it looks to collide with CPs. When a Mass encounters a CP, it will react to it based on a range of influence you can set in the Properties. However, if it doesn’t encounter a CP, but only a spline or patch, it will simply fall straight through as though nothing were there. This presents a difficulty as one of the great strengths of Hash patches is making lightweight geometry for our characters. Worse still, it can happen that the Cloth falls through one part of the model, but then gets stuck inside when it encounters a CP on its way back out. This is why my Cloth flings itself away from the sphere - as it’s sliding off, a few Masses have been caught inside the Sphere, which then cause the springs to which they’re attached to stretch and gain energy. When they’re finally liberated from the sphere, their springs contract with the force that they have gained, which is considerably more than you would have expected.
The only real way of dealing with this is simply making denser meshes. Most of the time, this will be an overly difficult solution to implement as it not only requires that we forego AM’s chief modeling advantage and possibly rebuild our entire model, but it still offers no guarantee that the Cloth won’t fall through the mesh. It amounts to something of “Hail Mary” solution.
We could add Forces to help control the Cloth, but it similarly carries no such guarantee. Mesh density and Force solutions are very indirect ways of influencing the behavior of the Cloth and thus can yield unpredictable results. A more direct method is preferred.
The first is the old-fashioned way. Look at the Action after you’ve run a simulation. Expand the Action Objects Folder, then the Spring System Action Object, and then the Masses. A keyframe has been made for each of the Masses at every frame. So, in principle, you could find the areas that aren’t what you want them to be, and simply move the appropriate Masses (moving CPs in Muscle Mode won’t have any effect - but you can translate the Masses by hand). This is extremely difficult and tedious since there is one keyframe at every frame for every Mass, so you would have to do a lot of tweaking to get better results. Still, it is possible.
The second deserves closer attention, as it will be the method to ultimately employ for controlled Cloth movement: Parts of the mesh that are not part of the Cloth group.
Cloth Constraints
Mass to CP / CP to Mass Constraints
AM Cloth creates two constraints nowhere else available in the software (i.e. you, the user, can only make use of these constraints via the Cloth Wizard). The first you’ve already seen, the CP to Mass Constraint. In the Splines Folder of the Action, if you expand it enough to see the individual CPs, you can see that each CP is constrained to one particular Mass. Those Masses have been subsequently created at the location of each CP in the group you wanted to have the Cloth Wizard applied to.
The second we haven’t encountered yet, but is the key to controlling Cloth animation, the Mass to CP constraint.
Let’s charge right in and see it in action. Go to your Action and delete all the Cloth information: the Action Objects Folder, the Splines Folder and the Spring System under the Objects heading in the PWS. Go into Muscle Mode and select only the right half of the model. Right Click the Group and select the Cloth Wizard. Go to Frame 0 and simulate.
The Cloth has not broken away from the model and is starting to respond directly to bone movement.
Now the Cloth is behaving much better. Even though the right half has fallen, attracted by gravity, it has not broken away from the model and into oblivion. This is because of the Mass to CP Constraint. Go back to Frame 0 and into the top view. Click on Dynamics Mode. You should now see on the right hand side of the model, the same sort of Mass and Spring network you saw earlier. But in the row of CPs just outside of the group you applied the Cloth Wizard to has a different representation. Instead of small red pixel, it’s an empty red box surrounding a CP. If you now expand the Action Objects, Spring System and Masses in the Action, you can see that not every Mass has a keyframe on it. In fact, they don’t have any. If you expand one of those you can see that they have a “Mass to CP” Constraint applied to them, and these are represented by the small red box in Dynamics mode.
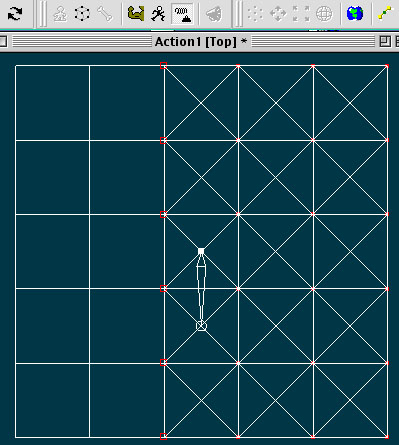 The Mass to CP Constraint anchors the Cloth to the rest of the model and, consequently, to bone movement.
The Mass to CP constraint allows the Spring System to be bound to the parts of the mesh that are not part of the Cloth group. Those Masses stay fixed relative to their CPs and underlying bone structure but are connected via springs to the free Masses of the Cloth group. In other words, even though they are fixed relative to their bones and follow only what the bone does, they exert influence over the rest of the Cloth by virtue of being connected to them via springs.
Let’s apply this toward affecting the whole model and not just one half of it. After all, the animation itself is rather lackluster - the left side is just stiff and the right side just droops and flails about.
Suspension CPs
Giving control back to the bones.
Delete all the material generated by the Cloth Wizard. Then go back into the model and select the entire grid. Hit ‘E’ to make an Extrusion group. Pull that up above the model and hit delete. What you should have now is a lot dangling splines above your model, like in this illustration.
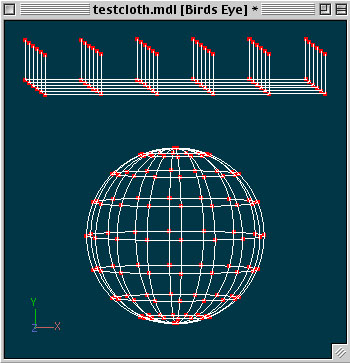 Extruding an extra set of CPs.
These are what I call “Suspension CPs”. In point of fact, they are regular CPs that will serve to scaffold Cloth. Notice that by hitting delete, you deleted the patches, so you don’t have any new geometry to render. Also, since the curves of patches are defined by an intersection of 2 splines, these new splines rising out of the grid’s intersections do not alter the shape of the geometry in any way.
Make sure to go into Bones Mode and add the new CPs to your grid’s bone.
Go back into your Action and to Frame 0. In Muscle Mode, from the front view draw a bounding box around just the grid, leaving the Suspension CPs out of the group. Right click on the group and select the Cloth Wizard.
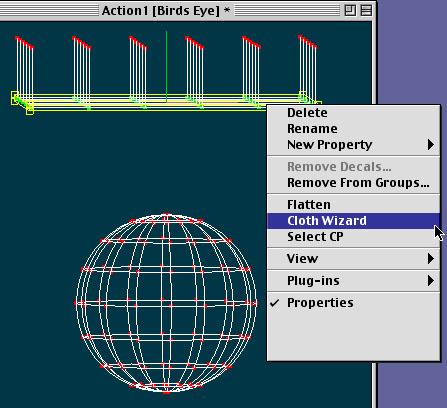 After extruding the extra set of CPs and adding them to your grid bone, select only the grid itself to apply Cloth to the whole of the renderable geometry.
Run the simulation. Here is my result.
My animation with Suspension CPs.
The Cloth now follows the bone’s movement, but I haven’t sacrificed the automated secondary motion
The motion may be a little odd, but the thrust of this example is that the Cloth is now following what the bone is doing. This is because we added those Suspension CPs which are animated simply with bone movement. By leaving those Suspension CPs out of the Cloth group, we’ve forced the Cloth Wizard to create Masses with Mass to CP Constraints at every one of those CPs and springs to connect those Masses to the grid beneath.
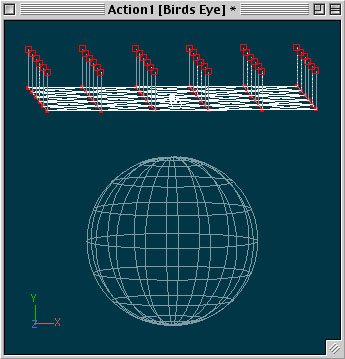 By leaving the Suspension CPs out of the Cloth group, they all get Mass to CP constraints applied to them.
This is the most direct method of applying control over Cloth. By extruding an extra set of Splines and CPs that neither render nor effect the shape of the geometry, we can make use of near-direct bone control of Cloth. I say “near-direct” because what is actually happening is the Cloth group is still ignoring what the bone is doing just like it always has. We’ve made it exert influence on the Cloth group by binding Masses to parts of the mesh that are not part of the Cloth group, but connected to it via Springs. So, in point of fact the Masses and Springs are dictating the movement of the Cloth, but we’ve forced the Cloth to pay close attention to bone movement via the Suspension CPs.